
Monday, 31 December 2018
Sunday, 7 October 2018
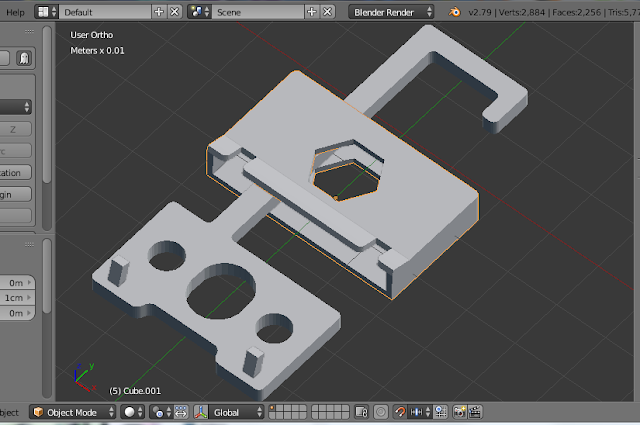
Making Bose QC 25 USB friendly
I've been using Bose QuietComfort 25 for a couple of years now. They are great for watching movies on long transatlantic flights, but their miniature on-the-wire microphone and 3mm audio jack makes them unusable for long transatlantic Skype calls. Adding USB capability sounded like a good idea, and it wasn't hard at all with my new Prusa i3 MK3 printer.
For Skype I've been using Plantronics 626 for almost 8 years and finally ear pads started to disintegrate. Instead of soursing a new ear pards for this discontinued headset I decided to used Bose QC 25 as a replacement :)
First make a model in blender3d:

Then print:
For Skype I've been using Plantronics 626 for almost 8 years and finally ear pads started to disintegrate. Instead of soursing a new ear pards for this discontinued headset I decided to used Bose QC 25 as a replacement :)
First make a model in blender3d:

Then print:
Making black visible on black
Yesterday I tried to print using black PLA on Prusa i3 MK3 and found that black PLA on black PEI is very hard to see :) But just a week ago I got my UV LED flashlight and it did the trick - turned black PEI heatbed coating to greenish and black PLA to blueish colour:

So no problems to control the first layer :)

So no problems to control the first layer :)
Sunday, 16 September 2018
Making Darkroom FIlm Hanging Clips
I do not have a darkroom, so I dry my 135 film in the shower hanging it to the shower frame using a few pieces of wire and paper clips. Or at least I used to until now. All these wires and paper clips are history now, thanks to my new shiny 3D printer.


Friday, 14 September 2018
Puting dials on feet
The first version of the stand for my salvaged dials functional but boring (see the previous post).
So here comes the new version which puts the dials on feet, literally.

So here comes the new version which puts the dials on feet, literally.

Sunday, 9 September 2018
Salvaging temperature and humidity dials
A few month ago my wall clock with temperature and humidity dials feel down from the wall and broke apart.
 For the clock mechanism it probably was a good move (I would throw it
out of window someday anyway, so loud it was). But temperature and
humidity dials were quite useful, so I decided to keep them and reuse
some day. And with my new and shiny Prusa i3 MK3 printer this day just
came yesterday.
For the clock mechanism it probably was a good move (I would throw it
out of window someday anyway, so loud it was). But temperature and
humidity dials were quite useful, so I decided to keep them and reuse
some day. And with my new and shiny Prusa i3 MK3 printer this day just
came yesterday.

Making Prusa i3 MK3 a bit more stable
A couple of weeks ago I got Prusa i3 MK3 kit as my first 3D printer.
 It took me two evenings and a half of Saturday to assemble it. What a nice piece of machinery it is!

I found only a couple of problems with it, first: rubber feet that just wait for any occasion to pop out of the frame when you move the printer.
There are lot of suggestion on Prusa forum how to fix it, using special printed locks, for example, or print completely new feet (what 3D printers are for anyway, if not for replicating and eventually taking over the word).
I've decided to make something myself. And here comes my second problem - last time I used blender3d years ago, so had to spent some time remembering how it works. But after a few trials I eventually got a result with suits me completely. Here it is - a simple shell for Prusa i3 MK3 feet in blender 3d:
Subscribe to:
Posts (Atom)